I include links to products I think could be useful for my readers. As an Amazon Associate, I earn commission from qualifying purchases.
Introduction
Understanding and managing storage in Linux is essential. There are several key concepts and commands for working with block storage. If you are an absolute beginner in configuring storage on Linux, then this article is for you. We will discuss:
- Block storage device naming and the /dev directory
- Disk partitioning
- Creating and mounting filesystems
- Logical Volume Manager (LVM)
Table of Contents
Every physical server or virtual machine has some directly attached block devices. These can be HDD, SSD, or USB Flash drives.
Whenever a new block device is inserted into the system, the available capacity is not immediately accessible. In other words, files and directories cannot be directly created on the device.
Some basic configuration is required to make the storage space available. It includes creating partitions, creating filesystems, and mounting.
Before we discuss the commands related to these operations, let’s discuss the /dev directory and block device naming.
Prerequisites
- A machine running Linux preferably CentOS 7 or higher
- At least 2 free storage devices
Block Storage Device Naming
Linux handles storage devices as files and stores them under the /dev directory. These are not typical files and they are called device nodes. It’s critical to understand this concept because most storage commands use these files as arguments.
Whenever a new block device is inserted or detected, the system automatically creates a new corresponding file under the directory /dev.
The name of this file depends on several things. Most importantly, it depends on the device bus type and the order in which the device was inserted relative to the other devices.
For example, if the bus type is SCSI or SATA, the first half of the file name is sd. The other half is a letter assigned in alphabetical order depending on the order in which the device was detected.
The first, second, and third SCSI devices on a system are named sda, sdb, and sdc, respectively.
Devices with other bus types are subject to slightly different naming rules. For NVMe, which is a modern bus type, the first part of the device name is nvme. There is also a bus number added in the middle. The final part is a letter and a number, which indicate the order of detection. For example nvme0n1 or nvme0n2.
We can list the content of the /dev directory to get an overview of all the block devices present on the system.

There are many files, including sda, sdb, sda1, sda2, nvme0n1, and nvme0n2.
Note that /dev also includes other files that are not related to storage devices.
sda and sdb are block devices. However, sda1 and sda2 don’t represent actual block devices. They represent partitions, which are discussed next.
Partitioning
What Is a Partition
Partitioning is the operation of dividing the block device into logical block devices called partitions. It is the first operation to do before we can use the disk.
To list all disks and partitions present on the system, use the command: lsblk
[root@localhost ~]# lsblk
NAME            MAJ:MIN RM SIZE RO TYPE MOUNTPOINT
sda               8:0    0  20G  0 disk
├─sda1            8:1    0   1G  0 part /boot
└─sda2            8:2    0  19G  0 part
  ├─centos-root 253:0    0  17G  0 lvm  /
  └─centos-swap 253:1    0   2G  0 lvm  [SWAP]
sdb               8:16   0  20G  0 disk
nvme0n1         259:0    0   8G  0 disk
nvme0n2         259:1    0   8G  0 disk
lsblk shows a clear tree structure of disks and their partitions. Also, the “type” column of the output indicates whether the line represents a disk, partition, or LVM. (LVM type is an advanced storage scheme that is discussed later on)
There are mainly two partitioning schemes: the Master Boot Record (MBR) and the GUID Partition Table (GPT). MBR is a legacy partitioning scheme, but it is still used. It is limited to a maximum disk size of 2 TiB. GPT partitioning is preferred because it breaks the limit of the 2 TiB disks and introduces other enhancements.
How To Create a Partition
The fdisk command creates MBR partitions, while the gdisk command creates GPT partitions. Both are interactive commands, and they are very similar.
These commands create a partition table on the first few sectors of a disk. (With GPT, the partition table is also backed up at the last few disk sectors).
This table contains all the information about the partitions. For example, it includes the sector addresses where every partition begins and ends. (A sector is the minimum read/write block size used by disks, it’s usually 512 Bytes).
Let’s see an example. We have a CentOS VM with a 20 GB disk named sdb. Note that the disk name on your machine could be different. Make sure to select the right disk. We will create a new GPT partition table and two partitions with 2 GB each.
Storage-related commands are usually restricted to the root user only. So login as root and use the command gdisk /dev/sdb as below
[root@localhost ~]# gdisk /dev/sdb
GPT fdisk (gdisk) version 0.8.10

Partition table scan:
  MBR: not present
  BSD: not present
  APM: not present
  GPT: not present

Creating new GPT entries.

Command (? for help):
The output above indicates that the sdb disk doesn’t have any partition table yet. Insert the question mark character “?” and enter to see all available commands:
Command (? for help): ?
b       back up GPT data to a file
c       change a partition's name
d       delete a partition
i       show detailed information on a partition
l       list known partition types
n       add a new partition
o       create a new empty GUID partition table (GPT)
p       print the partition table
q       quit without saving changes
r       recovery and transformation options (experts only)
s       sort partitions
t       change a partition's type code
v       verify disk
w       write table to disk and exit
x       extra functionality (experts only)
?       print this menu
To create a new partition use the “n” command, which also creates a new partition table. The command is interactive and asks for the parameters below one by one:
- Partition number: because the disk doesn’t have any partitions yet, type 1 and press enter.
- First sector: the partition starts from this sector. Leave it empty and press enter. The default value, which is the first free sector, is selected automatically.
- Last Sector: This is where we indicate the required size of the partition. Type +2G, then press enter. Note that we can actually put the sector number, but this requires a further calculation to determine the exact sector that yields a partition of 2GB in size.
- Partition file system: Many filesystems are available. Leave the default value of “Linux filesystem” empty and press enter.
Command (? for help): n
Partition number (1-128, default 1): 1
First sector (34-41943006, default = 2048) or {+-}size{KMGTP}:
Last sector (2048-41943006, default = 41943006) or {+-}size{KMGTP}: +2G
Current type is 'Linux filesystem'
Hex code or GUID (L to show codes, Enter = 8300):
Changed type of partition to 'Linux filesystem'
Repeat the same process to create another 2GB partition. Then type “w” and then “y” to write everything, confirm, and quit.
Command (? for help): w

Final checks complete. About to write GPT data. THIS WILL OVERWRITE EXISTING
PARTITIONS!!

Do you want to proceed? (Y/N): y
OK; writing new GUID partition table (GPT) to /dev/sdb.
The operation has completed successfully.
To see the newly created partitions use lsblk:
[root@localhost ~]# lsblk /dev/sdb
NAME   MAJ:MIN RM SIZE RO TYPE MOUNTPOINT
sdb      8:16   0  20G  0 disk
├─sdb1   8:17   0   2G  0 part
└─sdb2   8:18   0   2G  0 part
Note that the sdb disk has a total capacity of 20 GB and contains two partitions, each 2 GB in size. It still has 16 GB of free space, on which we can create more partitions if needed.
Filesystems
What Is a Filesystem
A Filesystem is built on top of a partition. A partition without a file system can be seen as just a long array of sectors. The filesystem is a logical abstraction layer that enables the creation of a hierarchy of files and directories.
There are many types of filesystems. The most widely used in Linux are ext4 and xfs. xfs is the default file system on modern Red Hat and CentOS distributions, while Ubuntu uses ext4.
Create a Filesystem
Let’s continue with our example. We will create an xfs file system on the sdb1 partition that we have already created. The command to make a filesystem is mkfs. It uses the -t argument to specify the filesystem type.
[root@localhost ~]# mkfs -t xfs /dev/sdb1
meta-data=/dev/sdb1              isize=512    agcount=4, agsize=131072 blks
         =                       sectsz=512   attr=2, projid32bit=1
         =                       crc=1        finobt=0, sparse=0
data     =                       bsize=4096   blocks=524288, imaxpct=25
         =                       sunit=0      swidth=0 blks
naming   =version 2              bsize=4096   ascii-ci=0 ftype=1
log      =internal log           bsize=4096   blocks=2560, version=2
         =                       sectsz=512   sunit=0 blks, lazy-count=1
realtime =none                   extsz=4096   blocks=0, rtextents=0
Mount a Filesystem
After creating the filesystem, we are one more step away from utilizing the partition storage space. That step is mounting.
Mounting a filesystem is the operation of linking the filesystem created on top of a partition to the system’s file hierarchy. It includes choosing a directory on the file hierarchy to host the filesystem built on the partition. This directory is called a mount point.
Let’s create a new mount point called “data” and mount the sdb1 filesystem under /data.
[root@localhost ~]# mkdir /data
[root@localhost ~]# mount /dev/sdb1 /data
To confirm the success of the mount operation, we can list all the mounted filesystems using df -h
[root@localhost ~]# df -h
Filesystem               Size  Used Avail Use% Mounted on
devtmpfs                 484M     0  484M   0% /dev
tmpfs                    496M     0  496M   0% /dev/shm
tmpfs                    496M  6.8M  489M   2% /run
tmpfs                    496M     0  496M   0% /sys/fs/cgroup
/dev/mapper/centos-root   17G  6.2G   11G  37% /
/dev/sda1               1014M  137M  877M  14% /boot
tmpfs                    100M     0  100M   0% /run/user/0
/dev/sdb1                2.0G   33M  2.0G   2% /data
The last line indicates that the filesystem has been mounted under /data directory. Now it can be used to store files. All files created under /data directory are stored in the sdb1 partition.
Note that the xfs file system by default occupies some of the available space as metadata, which explains the used 33MB.
However, a manually created mount with the mount command does not survive a reboot. In most cases, the mount should last after a reboot. The mount parameters must be written in the file /etc/fstab to mount a partition persistently.
/etc/fstab, by default, contains all the persistent mounts required by the system. The root user can further add user-required mounts. Let’s see the content of this file:
[root@localhost ~]# cat /etc/fstab

#
# /etc/fstab
# Created by anaconda on Fri Aug 27 10:44:20 2021
#
# Accessible filesystems, by reference, are maintained under '/dev/disk'
# See man pages fstab(5), findfs(8), mount(8) and/or blkid(8) for more info
#
/dev/mapper/centos-root                      /       xfs     defaults      0 0
UUID=f0764a01-d372-4444-88a1-c226f7a209ba    /boot   xfs     defaults      0 0
/dev/mapper/centos-swap                      swap    swap    defaults      0 0
Each line in this file that doesn’t start with the hash character “#” corresponds to a mount, which is automatically created during the boot process. Each line contains 6 fields:
- Block device: a device file such as /dev/sdb1. Note that other device identifiers, such as UUID, also exist.
- Mount point.
- Filesystem type: xfs, ext4, vfat … etc.
- Mount options: These options are passed to the mount command at boot. The value “defaults” is usually selected unless some different mount options are required.
- Backup: this field takes the value 1 to enable filesystem backup at boot or 0 to disable it. The backup is done by the dump utility. Most systems do not come with the dump program installed by default, so this field is usually set to 0.
- Filesystem check: this field takes the value 1 to enable filesystem check at boot or 0 to disable it. The filesystem check is done by the fsck command, which reports any inconsistencies or errors in the filesystem structure.
To persistently mount the /dev/sdb1 partition under the /data directory we need to add a new line of configuration. Using Vim or nano edit /etc/fstab so that it looks like below:
#
# /etc/fstab
# Created by anaconda on Fri Aug 27 10:44:20 2021
#
# Accessible filesystems, by reference, are maintained under '/dev/disk'
# See man pages fstab(5), findfs(8), mount(8) and/or blkid(8) for more info
#
/dev/mapper/centos-root                      /       xfs     defaults      0 0
UUID=f0764a01-d372-4444-88a1-c226f7a209ba    /boot   xfs     defaults      0 0
/dev/mapper/centos-swap                      swap    swap    defaults      0 0
/dev/sdb1                                    /data   xfs     defaults      0 0
This new configuration line will ensure that /dev/sdb1 is mounted on /data after every reboot. To ensure the mount configuration is correct without rebooting, use the mount -av command:
[root@localhost ~]# mount -av
/                        : ignored
/boot                    : already mounted
swap                     : ignored
/data                    : already mounted
The command “mount -av” is used to mount all entries in the “/etc/fstab” file that are currently unmounted. It is advisable to execute “mount -a” after making any changes to “/etc/fstab” to identify and rectify any potential typos or errors.
If there are unnoticed mistakes or issues in /etc/fstab, the next reboot might fail.
In some cases, putting the device file such as /dev/sdb1 in the first field of /etc/fstab could be problematic. If block devices are removed and then inserted in a different order, the names under /dev automatically change.
For example, the block device sdb could become sdc and vice versa. Hence, partition sdb1 becomes sdc1. /etc/fstab is a static file. Not knowing about the naming change, the system always mounts sdb1 to /data, which results in a wrong mount.
To prevent this issue, the filesystem’s Universally Unique Identifier (UUID) is used in the first field of /etc/fstab instead of the device block file.
Every filesystem is assigned a UUID when it’s created.
Use the command blkid to determine the UUID of the filesystem residing on the /deb/sdb1 partition:
[root@localhost ~]# blkid /dev/sdb1
/dev/sdb1: UUID="6d9337da-cbf3-45df-b982-2c9c97ae61a7" TYPE="xfs" PARTLABEL="Linux filesystem" PARTUUID="903ded73-4517-4cb4-8e62-b21bc155bc76"
The first UUID listed in the output of blkid corresponds to the filesystem. The filesystem’s UUID doesn’t change even if the device name changes. Therefore, using the filesystem’s UUID in /etc/fstab guarantees that the same filesystem is always mounted under the correct directory.
Edit /etc/fstab replacing the /dev/sdb1 line with the UUID. Your /etc/fstab should now look like this:
#
# /etc/fstab
# Created by anaconda on Fri Aug 27 10:44:20 2021
#
# Accessible filesystems, by reference, are maintained under '/dev/disk'
# See man pages fstab(5), findfs(8), mount(8) and/or blkid(8) for more info
#
/dev/mapper/centos-root                      /       xfs     defaults      0 0
UUID=f0764a01-d372-4444-88a1-c226f7a209ba    /boot   xfs     defaults      0 0
/dev/mapper/centos-swap                      swap    swap    defaults      0 0
UUID=6d9337da-cbf3-45df-b982-2c9c97ae61a7    /data   xfs     defaults      0 0
After editing /etc/fstab, use the command mount –a to mount the filesystems. If device names change, the mounts don’t get mixed up the next reboot. The system always mounts the filesystem with the correct UUID to the corresponding mount point regardless of the partition’s name.
Logical Volume Manager (LVM)
What Is LVM
LVM is a Linux storage technology that introduces an extra layer of abstraction on top of disks and partitions to provide advanced features such as logical volumes, thin provisioning, snapshots, and software RAID.
Most modern distributions support LVM, which overcomes the limitations imposed by partitions. Expanding or reducing partition sizes is very delicate, error-prone, and sometimes impossible, but changing the size of a volume is straightforward with LVM.
How Is LVM Structured
LVM consists of three main layers.
1. Block devices such as disks or partitions are referred to as Physical Volume (PV).
2. LVM consolidates all PVs under one or more storage pools called Volume Group (VG).
3. The available storage in a VG is used to create virtual block devices called Logical Volume (LV).
The LV is used to store data. It is comparable to a regular block device. After creating an LV, a filesystem must be built on top of it, and then it is mounted. The same steps for creating and mounting a filesystem for a regular partition apply to an LV.
LVM provides flexibility for managing storage. The size of an LV could be tailored based on needs. In the example figure below, 3 drives of 1 TB are merged into a VG, and 2 LVs with different sizes are created: 1TB and 2TB.
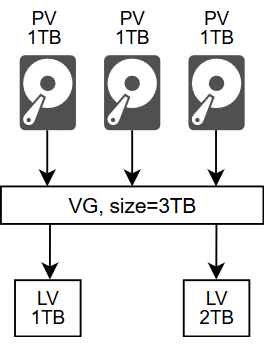
Once all drives are merged into a VG, different combinations of LVs can be created. For example, an LV can take all the available space on a VG. In such a case, the LV is spread on all disks. If the LV is about to be full, more drives can be added to the VG, and then the LV can be expanded. If the LV is no longer needed, it is deleted, and its space is returned to the owning VG.
Let’s see a configuration example of LVM. On our machine, we currently have two available disks, labeled as nvme0n1 and nvme0n2, as well as one available partition, denoted as sdb2, which can be observed in the output of the “lsblk” command.
[root@localhost ~]# lsblk
NAME            MAJ:MIN RM SIZE RO TYPE MOUNTPOINT
sda               8:0    0  20G  0 disk
├─sda1            8:1    0   1G  0 part /boot
└─sda2            8:2    0  19G  0 part
  ├─centos-root 253:0    0  17G  0 lvm  /
  └─centos-swap 253:1    0   2G  0 lvm  [SWAP]
sdb               8:16   0  20G  0 disk
├─sdb1            8:17   0   2G  0 part /data
└─sdb2            8:18   0  16G  0 part
nvme0n1         259:0    0   8G  0 disk
nvme0n2         259:1    0   8G  0 disk
In our example, one VG is created. It contains the drives nmvme0n1 (8GB), nvme0n2 (8GB), and the sdb2 partition (2GB). The VG is used to create one LV of 15GB. The LV contains an xfs file system and is mounted under directory /data2.
Create PV
The first step is to label the block devices or partitions as Physical Volumes (PV) using pvcreate. A PV can be a block device or a partition.
[root@localhost ~]# pvcreate /dev/sdb2 /dev/nvme0n1 /dev/nvme0n2
  Physical volume "/dev/sdb2" successfully created.
  Physical volume "/dev/nvme0n1" successfully created.
  Physical volume "/dev/nvme0n2" successfully created.
Create VG
Create a VG called “data_vg” using the newly labeled PVs using vgcreate
[root@localhost ~]# vgcreate data_vg /dev/sdb2 /dev/nvme0n1 /dev/nvme0n2
  Volume group "data_vg" successfully create
To list information about the available VGs, we can use vgs, which displays brief info about VGs, and vgdisplay, which shows more info.
vgs lists a VG per line, how many PVs per VG, available, and free space per VG. The system automatically created the “centos” VG during the installation phase.
[root@localhost ~]# vgs
  VG      #PV #LV #SN Attr   VSize   VFree
  centos    1   2   0 wz--n- <19.00g      0
  data_vg   3   0   0 wz--n- <17.99g <17.99g
[root@localhost ~]# vgdisplay
--- Volume group ---
VG Name centos
System ID
Format lvm2
Metadata Areas 1
Metadata Sequence No 3
VG Access read/write
VG Status resizable
MAX LV 0
Cur LV 2
Open LV 2
Max PV 0
Cur PV 1
Act PV 1
VG Size <19.00 GiB
PE Size 4.00 MiB
Total PE 4863
Alloc PE / Size 4863 / <19.00 GiB
Free PE / Size 0 / 0
VG UUID nRfReP-cMlt-btAO-TmN6-yepd-N332-Qa2x9y
--- Volume group ---
VG Name data_vg
System ID
Format lvm2
Metadata Areas 3
Metadata Sequence No 1
VG Access read/write
VG Status resizable
MAX LV 0
Cur LV 0
Open LV 0
Max PV 0
Cur PV 3
Act PV 3
VG Size <17.99 GiB
PE Size 4.00 MiB
Total PE 8189
Alloc PE / Size 0 / 0
Free PE / Size 8189 / <17.99 GiB
VG UUID m784Sx-9ZP8-Eaff-uz5n-CUji-lR1l-LvULQvYou may notice that the newly created VG “data_vg” has 17.99 GiB of free space instead of 18 GB which is the sum of storage available on all PVs.
Actually, the VG size is often slightly different than the sum of the storage space available on the PVs. In LVM, PVs are divided into blocks called Physical Extents (PE). The default size of the PE is 4MB. These blocks are combined to build the VG. So, the VG size is always a multiple of 4MB, which explains why the VG is not exactly 4MB.
Note that the PE’s size could be changed during the VG’s creation, but in our example, we left the default value.
Create LV
Create an LV called “data_lv” using the command lvcreate. It takes the LV size, name, and the parent VG as arguments.
[root@localhost ~]# lvcreate --size 15G --name data_lv data_vg
  Logical volume "data_lv" created.
To list available LVs, use commands lvs or lvdisplay.
[root@localhost ~]# lvs
  LV      VG      Attr       LSize   Pool Origin Data%  Meta%  Move Log Cpy%Sync Convert
  root    centos  -wi-ao---- <17.00g
  swap    centos  -wi-ao----   2.00g
  data_lv data_vg -wi-a-----  15.00g
The LV is a logical block device, hence it must have a corresponding file. When a VG is created, a directory with the VG’s name is created under /dev that holds a file for every created LV. In our example, the file that corresponds to data_lv is /dev/data_vg/data_lv. We can verify this by listing the content of /dev/data_vg.
[root@localhost ~]# ls /dev/data_vg/
data_lv
Now we create a filesystem on “data_lv” using mkfs.
[root@localhost ~]# mkfs -t xfs /dev/data_vg/data_lv
meta-data=/dev/data_vg/data_lv   isize=512    agcount=4, agsize=983040 blks
         =                       sectsz=512   attr=2, projid32bit=1
         =                       crc=1        finobt=0, sparse=0
data     =                       bsize=4096   blocks=3932160, imaxpct=25
         =                       sunit=0      swidth=0 blks
naming   =version 2              bsize=4096   ascii-ci=0 ftype=1
log      =internal log           bsize=4096   blocks=2560, version=2
         =                       sectsz=512   sunit=0 blks, lazy-count=1
realtime =none                   extsz=4096   blocks=0, rtextents=0
Finally, we create the mount point /data2 and mount data_lv. Then we verify the mount with df command.
[root@localhost ~]# mount /dev/data_vg/data_lv /data2
[root@localhost ~]# df -h
Filesystem                   Size  Used Avail Use% Mounted on
devtmpfs                     484M     0  484M   0% /dev
tmpfs                        496M     0  496M   0% /dev/shm
tmpfs                        496M  6.9M  489M   2% /run
tmpfs                        496M     0  496M   0% /sys/fs/cgroup
/dev/mapper/centos-root       17G  6.2G   11G  37% /
/dev/sda1                   1014M  137M  877M  14% /boot
tmpfs                        100M     0  100M   0% /run/user/0
/dev/mapper/data_vg-data_lv   15G   33M   15G   1% /data2
Now, the LV is mounted on /data2, and we can use it to store data. If the space is about to be finished, the lvextend command can be used to add space to the LV from the available VG space. If the VG is also about to finish, we can add a drive or a partition to the VG using the command vgextend.
Conclusion
In this article, we introduced basic concepts and commands for working with storage on Linux. The key takeaways are:
- Linux treats block storage devices as files stored under the /dev directory
- The name of files under /dev depends on the drive characteristics
- To use storage space on a drive, first, we must partition it, create a filesystem then mount it
- /etc/fstab is used to create mounts that survive a reboot
- LVM is a storage technology that consolidates all storage space under one pool.
- Key commands: lsblk, gdisk, fdisk, mkfs, blkid, mount, df, pvcreate, vgcreate, lvcreate.
In this post, we briefly introduced LVM. It supports more advanced features, such as RAID, snapshots, and thin provisioning, which are beyond the scope of this article.
If you are interested in learning more about Linux Storage, I highly recommend you read Sander Van Vugt’s Red Hat RHCSA 9 Cert Guide: EX200 Certification guide. It is a valuable resource filled with practical information beneficial for both administrators and developers.
I learned most of my Linux knowledge by reading that book and getting the RHCSA certification which I also highly recommend you to take.
The foundational knowledge discussed in this article will enable you to understand and configure more advanced storage technologies in Linux, such as Network File System (NFS), iSCSI, Virtual Disk Optimizer (VDO), Stratis, and many more.
Don’t Miss The Upcoming Projects!
Sign up to the newsletter to get notified whenever a new Project or Tutorial is published.
You can unsubscribe anytime.
Hi, thank you for the article, enjoyed reading it. Only figure 2 is not aligned with the text ?
looking forward for you next article,
Nico
Hi Nicolas, thank you for reading this post and for pointing out the issue. I updated the text with the correct screenshot now. Thanks again for picking up this mistake.